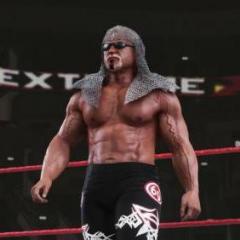
tekken57 Posted May 5, 2015 Share Posted May 5, 2015 (edited) WWE 2k15 PC Basic Texture Modding Tutorial Welcome to modding the pc version of WWE 2k15. This is just a brief tutorial on how to extract and inject textures into the pac files of the game. The game has a separate pac file for each wrestler corresponding to the wrestler id. For a full list of wrestler ID’s, visit the Smacktalks website and look under the modding tutorial section.Background to pac files The pac files contain all the files for each wrestler (and arena’s, etc) in the game. The file are structured in a hierarchical manner and I will explain this to you using the analogy of a cupboard. The pac file itself is like the cupboard. Inside this cupboard are a number of pach files. The pach files are like the drawers in the cupboard. Just like the drawers in a cupboard can contain clothes, shoes, etc, the pach file can contain models, textures etc. Some wrestlers have different pach files for an entrance attires, and may also contain pach files for alternate attires. In ring attires always end in “2” and entrance attires always end in “4”. Alternate attires use the second last number to indicate which attire it is e.g. ring attire 1 will be numbered 02 and ring attire 2 will be numbered 12. The attires start counting at 0. To illustrate, Hogan’s nWo wrestler id is 363. The first pach in his pac file is 00036302, this is his ring attire. The second pac file is 00036304, which is his entrance gear. If he had another attire, it would be numbered 00036312 and 00036314 for his entrance and ring attires.Lets Get Started With the background of the way lets get started with modding the game. Always take backups of all your files before doing any mods. First thing you need to do is get rid of the arc file in the game directory. The arc file is a file which lists the file sizes of all the game files. If you leave this file in the game directory, your game will crash when you use your mods. 1. Browse to your game directory and look for the file called plistWin32.arc. I rename this file to something else, you can either rename it, delete or move it to a backup directory. The choice is yours. 2. With the arc file out of the way, you can now start modding a wrestler of your choice. The wrestler pac files are stored in the pac – ch directory. As stated before the pac files correspond to the wrestler id’s. I am going to be working on Booker T which is ch108.pac. You can work directly on the file in the game installation path, but I prefer to copy the pac file to another location and work there. I also make a backup of the file before working. 3. With the ch108.pac file copied to your computer, open X-Packer and then open the pac file using the Open – PC Pac File – Pac File (Or use the Ctrl + Q shortcut). With the Booker T pac file open, you will notice that there is only one pach listed, 00010802. As discussed above, this is his ring attire for attire 1. Click the extract button on the row with the pach listed. Save the pach file in a location of your choice. 4. Open the pach file in X-Packer using the Open – PC Pac File – Pach File. You will see a number of files listed. The file which you will be modding most commonly are the 0000 file which is the model, the 000C and 000A files which contain the textures, and the 2715 file which is the hair. The file are compressed by default, you can determine this by the extension. If the extension is ZLIB or BPE, then the file is compressed. In order for us to work with the files we need to uncompress them. You can either compress the files individually or all at once. I’m going to uncompress all, so I’m going to click the Uncompress All button in X-Packer. Select a location to uncompress the files to and all the files will be extracted and uncompressed there. If you browse to the directory you will find that there are files with a zlib extension and files with an “uncompressed” extension. The zlib files are not require so you can delete these or retain them for backup purposes. I usually delete the zlib files to keep my workspace clean. 5. Like I stated before, the 0000.zlib.uncompressed file is the main model, 000C.zlib.uncompressed contains the head and body textures and the 000A.zlib.uncompressed contains the attire textures and the normal maps. For the purpose of this exercise, I’m just going to work with the face texture. The process for working on the attires and normal maps is the same. Open the 000C.zlib.uncompressed file using the Open – PC Pac File – Texture Archive (or the Ctrl + Y shortcut). You will see three textures listed: all_color, head and head_f. Extract the head texture. 6. Open the head texture in photoshop. Make whatever adjustments you want to it. I’m going to make the head green, just to illustrate. 7. Once you are done editing the texture, save the texture as dds. There are two types of dds textures, the face and body textures are DXT without alpha and the Normal Maps, hair etc are DXT with alpha. There are texturing tutorials on this topic, so read up on those. The settings you need to save the face textures and normal maps are in the help pic above. 8. Now that you have saved the texture click the inject button on the row where the head texture is listed. X-Packer checks the filesize to determine wether you have saved the texture in the correct format. If you have saved the texture correctly, you will get a message stating the the texture has been injected successfully. 9. The texture is now injected into the texture archive. Now we need to put the texture archive back into the pach file and then back into the pac file. Open the 00010802 pach file in X-Packer and click on “inject file” on the row where 000C is listed. Select the 000C.zlib.uncompressed file and the texture archive will be injected into the pach file. You will notice that the extension of the file has been changed and is no longer zlib, this means that the texture archive is no longer compressed. 10. Open the cho108.pac file and select inject on the row with 00010802 listed. Select the 00010802 pach and the pach file will be injected. You are now ready to test the mod in game. Copy the ch108.pac file to your pac – ch directory, overwriting the old file. Start the game and select Booker T in the creation suite. If you have done everything correctly, you will see that his head is now green. That’s it, your very first texture mod. The are many more advanced tutorials in the modding section on Smacktalks and on my site http://sf4mods.blogspot.com Edited May 5, 2015 by tekken57 5 Quote Link to comment Share on other sites More sharing options...
tekken57 Posted May 5, 2015 Author Share Posted May 5, 2015 A basic primer for people new to modding wwe games. X-Packer with pc support coming soon. 1 Quote Link to comment Share on other sites More sharing options...
Krossfaded Posted May 5, 2015 Share Posted May 5, 2015 This is great Tek! Quote Link to comment Share on other sites More sharing options...
Red Rooster Posted May 5, 2015 Share Posted May 5, 2015 Great tut! Quote Link to comment Share on other sites More sharing options...
tekken57 Posted May 5, 2015 Author Share Posted May 5, 2015 (edited) Thanks guys. X-Packer 10.2 has just been released, so pc texture mods are now possible. Edited May 5, 2015 by tekken57 Quote Link to comment Share on other sites More sharing options...
xWrestling Posted May 5, 2015 Share Posted May 5, 2015 I love you tekken57!!! 4 this Awesome XPacker! Quote Link to comment Share on other sites More sharing options...
B2Y Posted May 5, 2015 Share Posted May 5, 2015 great stuff guys God bless you all Quote Link to comment Share on other sites More sharing options...
tekken57 Posted May 5, 2015 Author Share Posted May 5, 2015 @bannockburn, you can replace any of the models contained within the pach files. Your ICW arena looks awesome btw . 1 Quote Link to comment Share on other sites More sharing options...
eri619 Posted May 5, 2015 Share Posted May 5, 2015 great work tekken! Quote Link to comment Share on other sites More sharing options...
wtferrell Posted May 5, 2015 Share Posted May 5, 2015 Awesome, just pure awesome. Thanks for this Tekken Quote Link to comment Share on other sites More sharing options...
chunked Posted May 5, 2015 Share Posted May 5, 2015 Awesome job. So quick question, since you elaborated on alternate attires, is it possible to add pach files to the pac with the game successfully recognizing them as separate attires? Quote Link to comment Share on other sites More sharing options...
Elliot Posted May 5, 2015 Share Posted May 5, 2015 Thankyou for this, mate! This is really helpful for new modders like myself. Quote Link to comment Share on other sites More sharing options...
Bob_Van_Dam Posted May 5, 2015 Share Posted May 5, 2015 Awesome, will definitely be donating for X-Packer in the future. Quote Link to comment Share on other sites More sharing options...
tekken57 Posted May 5, 2015 Author Share Posted May 5, 2015 Awesome job. So quick question, since you elaborated on alternate attires, is it possible to add pach files to the pac with the game successfully recognizing them as separate attires? This was possible with previous games. I haven't had the time to test this with the pc version but the misc.pac which controls the attires looks the same. It should be possible, will test when I get some time. Quote Link to comment Share on other sites More sharing options...
Elliot Posted May 5, 2015 Share Posted May 5, 2015 Awesome job. So quick question, since you elaborated on alternate attires, is it possible to add pach files to the pac with the game successfully recognizing them as separate attires? This was possible with previous games. I haven't had the time to test this with the pc version but the misc.pac which controls the attires looks the same. It should be possible, will test when I get some time. This would be game-changing considering the only option we have for our own alternate attires at the minute is taking up CAW slots. Would this mean, if it's possible, we could essentially add any amount attires to anyone (within reason)? Quote Link to comment Share on other sites More sharing options...
ALCRUSHYOU Posted May 5, 2015 Share Posted May 5, 2015 Are the player menu selection pictures hosted inside the pac files? Quote Link to comment Share on other sites More sharing options...
Twistedmisery666™ Posted May 5, 2015 Share Posted May 5, 2015 Hey Tekken when you open up the textures and extract them are they say same as the 360 ver or separate peaces of textures when you open the 00c.pac like etc body head legs arms Quote Link to comment Share on other sites More sharing options...
tekken57 Posted May 5, 2015 Author Share Posted May 5, 2015 The textures are separate dds files. @eliot, the older games allowed for 10 attires per wrestler, not sure about the pc version. Quote Link to comment Share on other sites More sharing options...
tekken57 Posted May 5, 2015 Author Share Posted May 5, 2015 Just tested alt attires, works exactly the same as older games. You can add 10 attires per wrestler. Quote Link to comment Share on other sites More sharing options...
Twistedmisery666™ Posted May 5, 2015 Share Posted May 5, 2015 The textures are separate dds files. @eliot, the older games allowed for 10 attires per wrestler, not sure about the pc version. Wow separate this time around for pc hmm wonder if we can do more to them then. Prolly like that cuz we can edit them in the studio right ? Quote Link to comment Share on other sites More sharing options...
wtferrell Posted May 5, 2015 Share Posted May 5, 2015 Holy cow 10 per person? Freaking amazing. Thanks Tekken Quote Link to comment Share on other sites More sharing options...
Suffer Posted May 5, 2015 Share Posted May 5, 2015 Don't know if this thread can be used to ask for help so apologies if it isn't, Does anyone know where the match up screen textures would be? I found the ltpj_matchup_raw_1on1 file but when trying to extract it through X-Packer it didn't seem to extract any textures. Quote Link to comment Share on other sites More sharing options...
TBM Posted May 5, 2015 Share Posted May 5, 2015 If I buy X-Packer, do I get lifetime updates, or am I literally only buying the current version? Quote Link to comment Share on other sites More sharing options...
chunked Posted May 5, 2015 Share Posted May 5, 2015 (edited) Just tested alt attires, works exactly the same as older games. You can add 10 attires per wrestler. That's great to hear. I'm sorry for the noobish questions, but what does the process of adding new wrestlers to the game look like, like how it was done with that Community DLC? Do you copy wrestlers in the game and then modify their textures and models? If so, can you do that with this program? Or did you modify existing, "less popular" wrestlers? Edited May 5, 2015 by chunked Quote Link to comment Share on other sites More sharing options...
Elliot Posted May 5, 2015 Share Posted May 5, 2015 Just tested alt attires, works exactly the same as older games. You can add 10 attires per wrestler. Fantastic! Even greater news. Up to date attires for everybody. Quote Link to comment Share on other sites More sharing options...
Recommended Posts
Join the conversation
You can post now and register later. If you have an account, sign in now to post with your account.